MCP Server Setup Instructions
Learn how to setup your AI assistant with ClickUp's MCP server.
Setup instructions
Below are the setup instructions for some of the most popular AI assistants.
Claude
Set up Claude to use the ClickUp MCP server!
Pro, Team, Enterprise
If you're on the Pro, Team, or Enterprise plan:
- In a browser or the desktop app, navigate to Settings in the sidebar.
- Scroll to Connectors at the bottom and click Add.
- In the prompt, enter the following:
- Name: ClickUp
- Remote MCP Server URL: https://mcp.clickup.com/mcp
Free
If you're on the Free plan of Claude, you'll set up the MCP server from the Claude desktop app:
- Go to your Claude desktop settings page.
- Click on Developer section.
- Click on edit config then open the
claude_desktop_config.jsonwith your editor of choice. - Add the following and restart the Claude desktop app:
{
  "mcpServers": {
    "clickup": {
      "command": "npx",
      "args": ["-y", "mcp-remote", "https://mcp.clickup.com/mcp"]
    }
  }
}
Claude Code
Use the follow command:
claude mcp add --transport http clickup https://mcp.clickup.com/mcp
Once you've opened a Claude Code session, run /mcp to go through the authentication flow.
Cursor
Install here, or from Cursor's MCP directory page.
Manual installation
To manually set up Cursor for the ClickUp MCP server, add the following to your mcp.json file:
{
  "mcpServers": {
    "clickup": {
      "url": "https://mcp.clickup.com/mcp"
    }
  }
}
Devin
Set up Devin to use the ClickUp MCP Server.
Manual installation
- Open your Devin settings.
- Navigate to the MCP Marketplace.
- Click the button to Add your own MCP.
- Enter a name for the server (e.g., "ClickUp").
- Set the Transport Type to HTTP.
- Enter a short description.
- Paste the following link into the Server URL field: https://mcp.clickup.com/mcp
- For Authentication, select OAuth.
- Enable the server.
The first time you use the integration, Devin will attempt to connect and ask for authorization. Click the link provided to authorize your ClickUp workspace.
Microsoft Copilot Studio
Set up Microsoft Copilot Studio to use the ClickUp MCP Server.
Manual installation
- Open Microsoft Copilot Studio and navigate to your Agent.
- Scroll down to the Tools section.
- Click Add Tool.
- Then click New tool
- Select Model Context Protocol.
- Enter a Name for the tool, such as
ClickUp - Enter a short Description for the tool.
- Paste the Server URL: https://mcp.clickup.com/mcp
- For Authentication, select OAuth.
- Ensure the configuration is set to Dynamic Discovery (DCR).
- Click Create to finish setting up the tool.
VS Code
Set up VS Code to use the ClickUp MCP server!
Manual installation
To manually set up VS Code for the ClickUp MCP server, open a terminal and run the following command:
code --add-mcp '{"type":"http","name":"clickup","url":"https://mcp.clickup.com/mcp"}'
Then, from inside VS Code, go to your extensions section.
You will find ClickUp MCP at the bottom of the list of MCP servers.
Click the settings cogwheel on the ClickUp MCP and click Start Server.
Follow the links to finish the authentication flow.
Windsurf
To set up Windsurf for the ClickUp MCP server:
- Press Ctrl + , on Windows or Cmd + , on Mac to open your Windsurf settings.
- Under Scroll to Cascade, click MCP servers.
- Click Add Server, then select Add custom server.
- Copy the following JSON to your Windsurf MCP config file:
{
  "mcpServers": {
    "clickup": {
      "serverUrl": "https://mcp.clickup.com/mcp"
    }
  }
}
ChatGPT
Note: In Team, Enterprise, and Edu workspaces, only owners and admins have permission to configure MCP servers.
To set up ChatGPT to use the ClickUp MCP server:
- Navigate to Settings and click Connectors.
- Add a custom connector with the server URL:
https://mcp.clickup.com/mcp. - It will be visible in the Deep Research tool. This tool can be accessed by clicking the plus button next to the input text box.
- You may need to add the server as a source.
Note: Connectors can only be used with Deep Research.
Setup a custom MCP server in ChatGPT
Note: Developer Mode must be used because the MCP server is not an official connector and is considered untrusted.
-
Navigate to Settings in ChatGPT.
-
Go to Apps and Connectors.
-
Scroll to the bottom. Under Advanced Settings, enable Developer Mode .
-
Return to the main Apps and Connectors page. The "Create" button should now be visible.
-
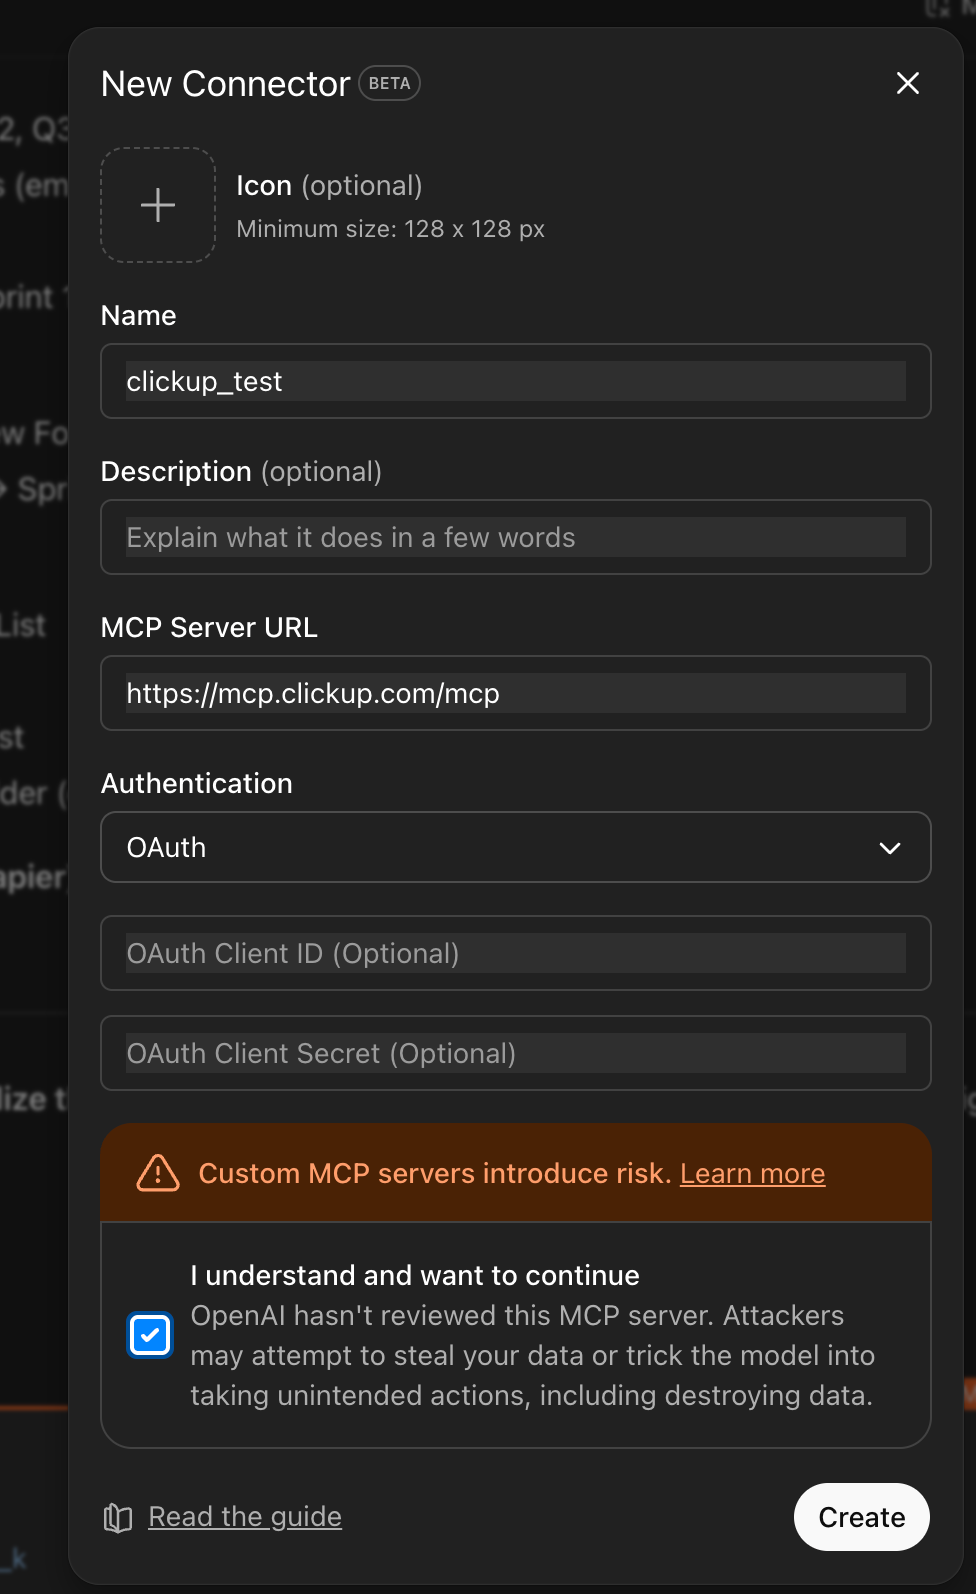
Click Create and select ClickUp as the connector.
-
Set the MCP Server URL:
https://mcp.clickup.com/mcp -
Set Authentication to OAuth.
-
Review the disclaimer and check the box for I understand and want to continue.

-
Complete the authentication process:
- Select your ClickUp Workspace.
- Click Connect.
-
Once connected, close the authentication window.
-
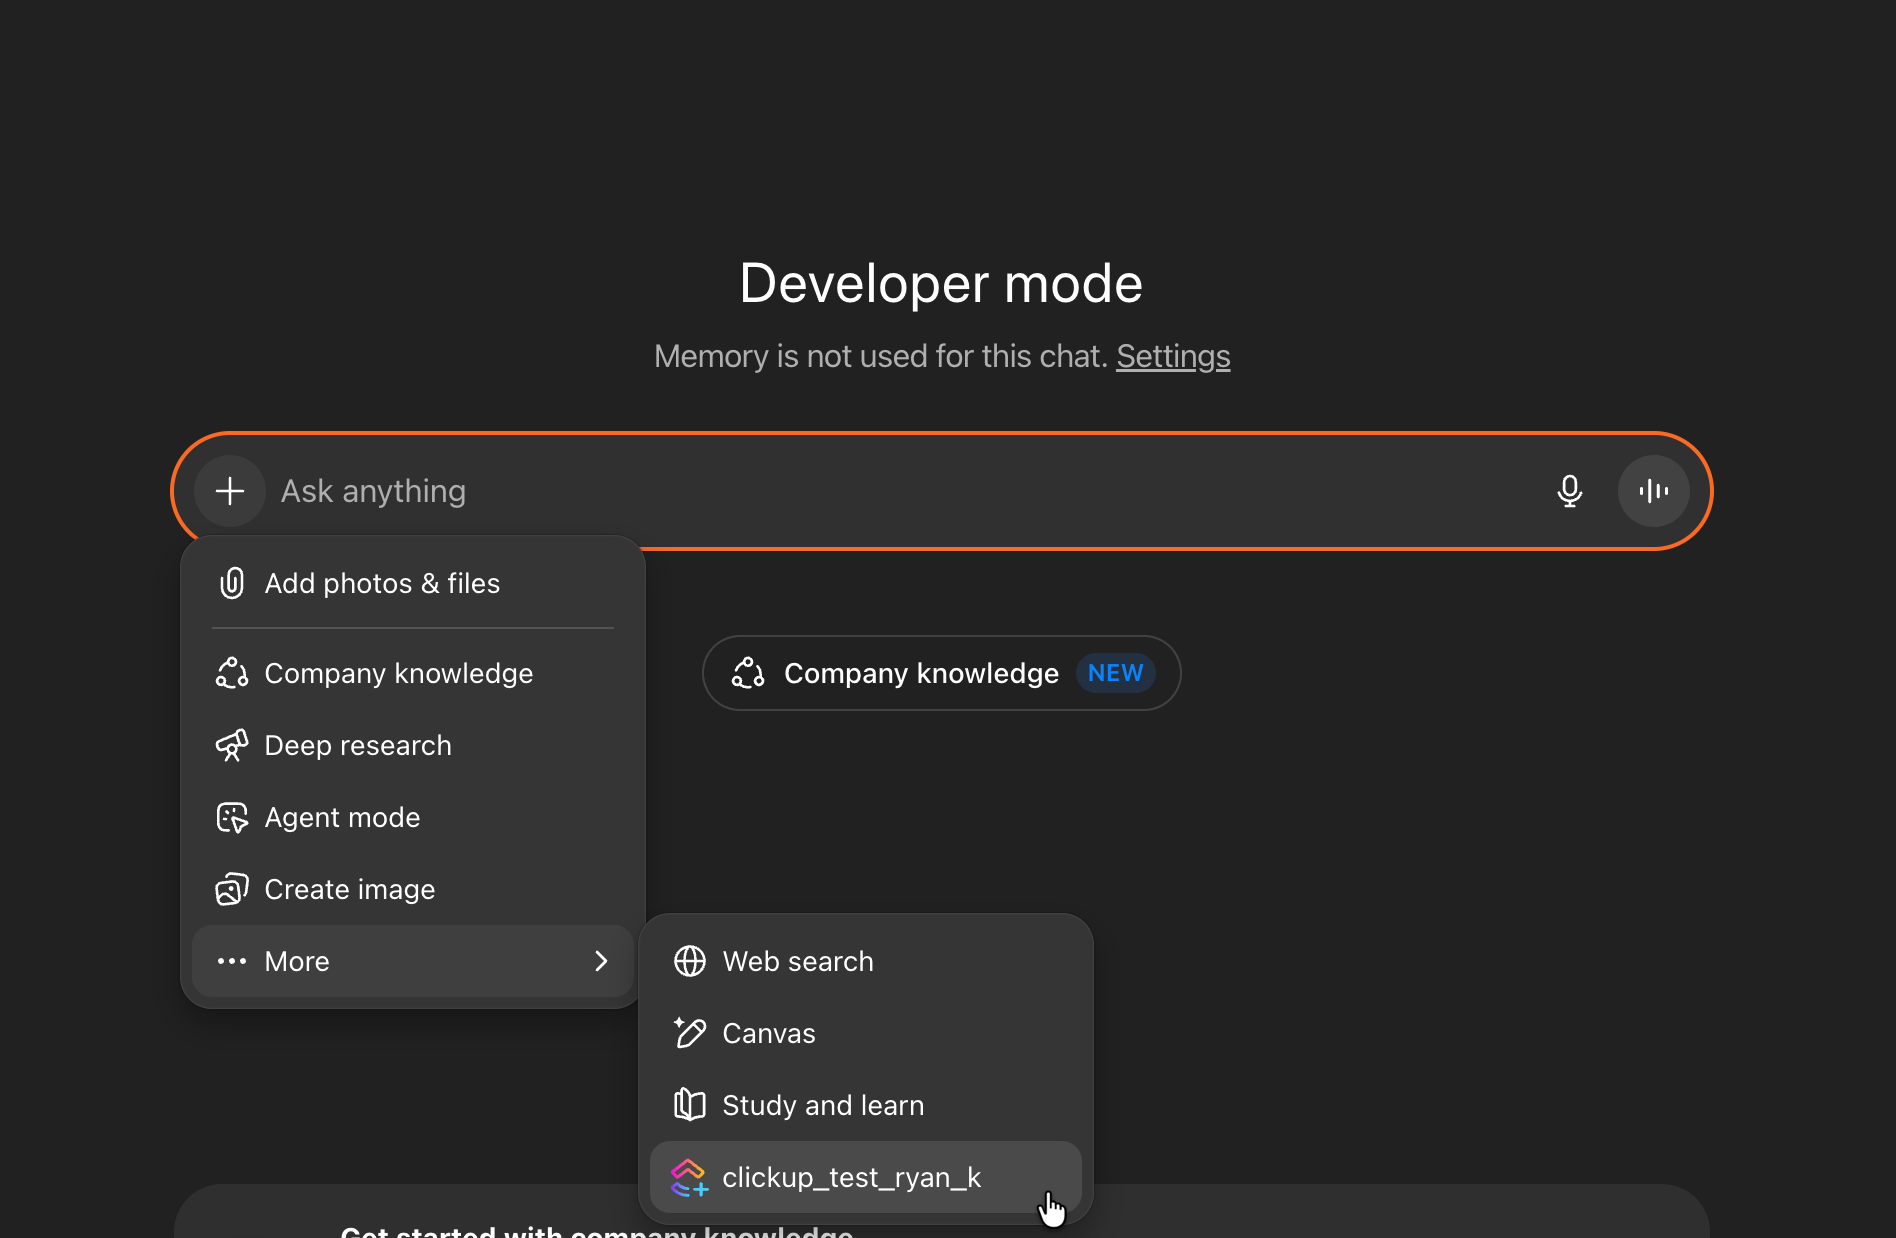
In ChatGPT, click the Plus button, then More, and select your custom connector.

-
Confirm that ClickUp is now available as a connector and test by requesting your ClickUp Workspace Hierarchy.
Want to use the ClickUp connector in ChatGPT? Learn more
Other clients
Vetted List: Reminder that if your MCP isn’t on our vetted list of supported clients, you can request a review here.
You can configure most other clients to use ClickUp's MCP server with the following settings:
Command: npx
Arguments: -y mcp-remote https://mcp.clickup.com/mcp
Environment: None
Updated 5 days ago